Do you understand your customer?
It’s no longer enough to just know their age bracket, gender, and general interests. Do you know what emotions they’re feeling while looking to satisfy their needs? What thoughts go through their head when walking through a retail store? What online platforms they browse and what time of day they typically go on them?
These complex inquiries are what require a detailed and thorough customer journey map. By following a customer journey map, a brand can understand them on a human level and therefore deliver an authentic, seamless experience.
While there’s a number of ways to go about this, here is a general framework of how to build a customer journey:
Step 1: Identifying Customer Personas
To begin this customer journey map, you will first need to identify the different customers that you cater to. As your customers will be different and therefore shop and interact with your brand differently, each persona will have a distinct customer journey. Look for online tools to help you develop personas, such as this one by Hubspot.
Step 2: Outline the buying process
While the “Awareness -> Interest -> Consideration -> Purchase -> Loyalty” buying process is popularized and used as a standard, it will differ by industries and segment.
For example, B2B may have a buying process that is more focused on the journey of supplier or agency sourcing. Accordingly, the buying process may look more like this: “Research -> Comparison -> Workshop/Pitch -> Quote -> Sign-Off -> Loyalty.”
Meanwhile, an academic program buying process may appear significantly different due to a smaller spotlight on costing. It might look more like this: “Research -> Application -> Enrolment -> Onboarding -> Advocacy.”
Determine what buying process is best aligned to how consumers interact with your business.
Step 3: Discover the touchpoints
At this step it’s time to take the business hat off and put yourself into the consumer’s shoes.
List all the relevant points of customer interaction before, during, and after discovering your brand.
Here’s a starting list of example questions to ask for establishing the touchpoints:
- How does the customer discover your brand?
- If online, any particular platforms?
- If in store, what stores? And how do they browse?
- When will the customer interact?
- Is the need triggered by an event? Or is it impulsive?
- What prompts the customer to choose your brand?
- Is there a particular value proposition or point-of-difference that speaks to them?
- What are they feeling at each touchpoint?
- For example, with an emergency repair service, the initial touchpoint emotions will likely be panic and exasperation, followed by relief in the resolution.
To gather and confirm these touchpoints, it is worthwhile to survey and interview customers, or look into existing analytics on your website, store foot traffic, and any other recorded touchpoint locations/platforms your customers interact with.
Step 4: Recognizing the friction points
A friction point is where an existing or potential customer has their buying process slowed or delayed – risking a “forget about it!” moment where the customer abandons their cart or dismisses the brand.
Friction points are everywhere, from beginning to end of the shopping journey. This can include a slow website, “Out of stock” inventory, cumbersome online account making, and long shipping times. Consumers will only be so patient before turning to your eager competition – so the less friction, the better your bottom line.
As with the previous step, using customer data and available analytics will help confirm where the major friction points might be. For example, an e-commerce site can evaluate Google Analytics cart abandonment reports, which indicates exactly which step caused the consumer to leave. Here you can pinpoint exactly which steps are friction points for the consumer and take action to improve them.
Step 5: Evaluate action items
Now that you’ve identified the customers’ shopping behavior, needs, and frustrations, assess what can be done to streamline the process and optimize the experience. This may involve further customer interviews and surveys, investment in better technology infrastructures, and updated employee training guides.
This section can also include qualifiers such as KPI’s, as well as an outline of responsible teams/departments and budget.
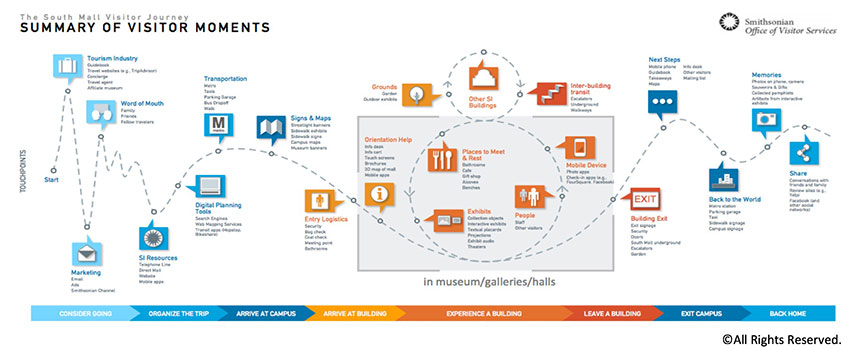
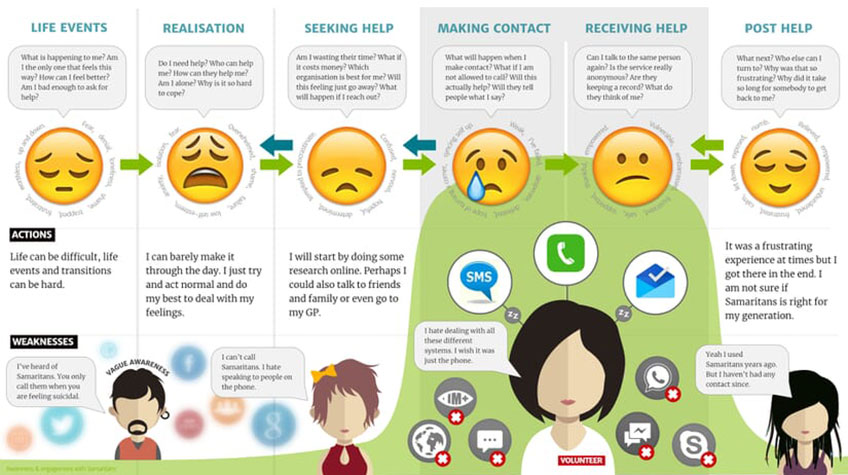
Step 6: Bring it to life with a visual map
Last but not least, put all the hard work and thinking into a visual map. This can be in the form of a chart or include visuals such as infographics and videos. Remember: keeping it simple is key, it shouldn’t outline every single nuance of all the paths a customer should take, but just depict a visual of baseline customer needs.
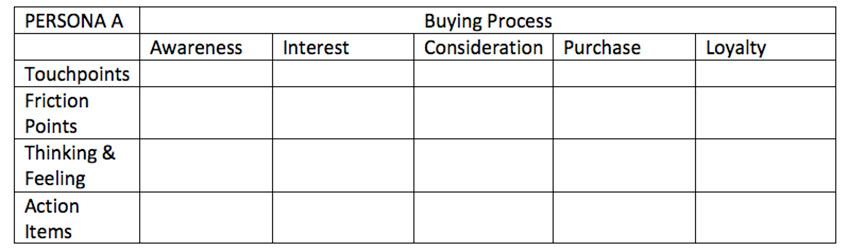
This whole process can be put into a table format such as below for easy organization and integration into a customer journey map:
Here are a few great customer journey maps to inspire you: